A cluttered pantry isn’t just an eyesore, it’s a money pit. Expired spices, forgotten bulk items, and half-empty boxes pile up when everything’s shoved into cabinets without a system. Kitchen storage containers with lids solve this problem by making items visible, protecting food from pests and moisture, and turning your pantry into a space that actually works for you. Whether you’re reorganizing a small apartment kitchen or tackling a full culinary overhaul, the right containers keep your dry goods fresh, your freezer organized, and your sanity intact.
Table of Contents
ToggleKey Takeaways
- Kitchen storage containers with lids extend shelf life by protecting dry goods from air, humidity, and pests—keeping items like flour, sugar, and cereal fresh for weeks or months instead of days.
- Clear storage containers reduce food waste and duplicate purchases by making pantry contents visible, while labeled containers help you track expiration dates and prevent expired ingredients from accumulating.
- Choose container materials strategically: plastic for freezer and everyday dry goods, glass for fridge storage and frequently accessed items, and stainless steel for light-sensitive ingredients like specialty flours.
- Organize containers by frequency of use, placing daily-use items at eye level and occasional-use items on higher or back shelves, and use drawer dividers to prevent containers from tipping or sliding.
- Maintain container longevity by hand-washing silicone gaskets monthly, avoiding thermal shock with glass containers, and replacing containers showing discoloration, cloudiness, or failed seals—signs they’ve stopped protecting food reliably.
- Apply the FIFO (First In, First Out) rule by placing newer containers at the back and older ones toward the front, ensuring you use up ingredients before they expire and maximize your investment.
Why Kitchen Storage Containers Are Essential for Home Organization
Good kitchen storage containers with lids do more than look neat on a shelf. They extend the shelf life of pantry staples, flour, sugar, cereal, nuts, and baking ingredients deteriorate when exposed to air and humidity. Airtight seals keep pests and moisture out, which is why bulky original packaging often doesn’t cut it. Most people don’t realize that open boxes of crackers, pasta, or granola go stale in days, while the same items in sealed containers stay fresh for weeks or months.
Beyond preservation, containers create accountability. When everything’s visible in clear containers, you actually know what you have. You’ll stop buying duplicate items, reduce food waste, and use up ingredients before they expire. This visibility also frees up mental energy, no more playing pantry roulette, wondering if you bought baking powder last month. In modern kitchens, where space is at a premium and grocery prices keep climbing, storage containers with lids aren’t a luxury: they’re a practical investment that pays for itself through reduced waste.
Types of Kitchen Storage Containers and Their Best Uses
Plastic, Glass, and Stainless Steel Options
Plastic containers are the workhorse of kitchen storage. BPA-free polypropylene and Tritan plastic resist staining and odors better than older plastics, and they’re dishwasher-safe and lightweight. They’re ideal for everyday dry goods like cereal, pasta, rice, and snacks. The downside: they’re less durable than glass long-term and can become cloudy or brittle after years of use. Look for containers with snap-lock or silicone-gasket lids that create airtight seals without being frustrating to open.
Glass containers offer durability and chemical neutrality, nothing leaches into your food. They don’t stain, don’t absorb odors, and last decades with proper care. The tradeoff is weight and fragility. Glass works best for items you’ll handle frequently or store in the fridge or freezer, where their temperature stability shines. Many homeowners choose a mix: plastic for dry pantry goods, glass for oils, vinegars, and frequently accessed items.
Stainless steel containers are premium options, excellent for keeping light-sensitive ingredients (like whole grains and specialty flours) fresh. They’re durable and sleek but expensive and typically opaque, so you can’t see contents at a glance. Most DIYers reserve stainless steel for coffee, tea, or as display pieces in open shelving.
The best approach is matching container type to use. Clear plastic works for the freezer: glass suits the fridge. Opaque containers protect light-sensitive dry goods. Resources like Good Housekeeping’s tested food storage containers break down real-world performance of different materials, helping you choose based on actual lab results rather than guesswork.
How to Choose the Right Containers for Your Needs
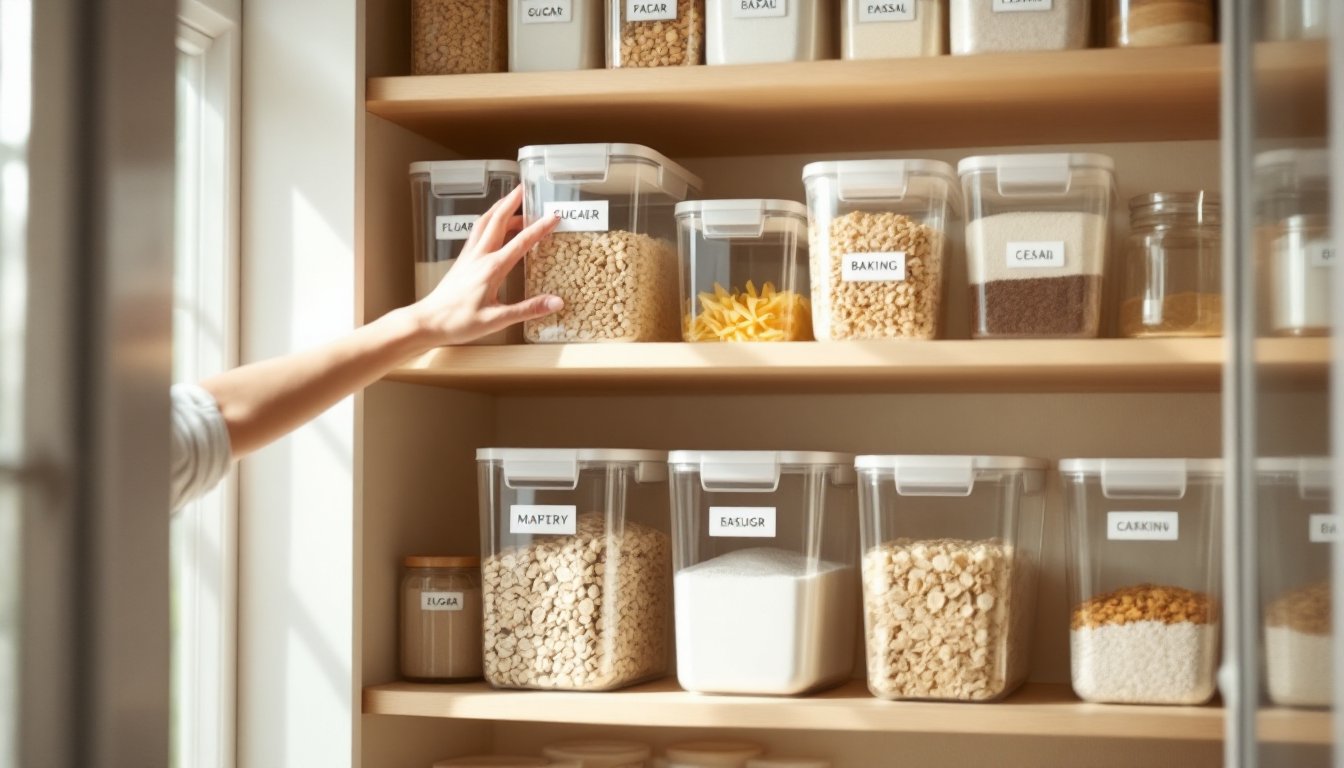
Start by auditing what you actually store. Are you managing bulk flours and grains, snacks, baking ingredients, or all three? Each has different container needs. A 4-quart container suits flour and sugar: a pint-sized container is overkill for vanilla extract.
Measure your shelf space and existing cabinet dimensions before buying. Standard rectangular containers stack better than round ones and use space efficiently, a 5x7x3-inch container beats a large square when your shelves are shallow. Account for lid height too: a container stacked three high might not fit under your upper cabinets. Write down shelf heights in inches so you’re not guessing in the store.
Consider the seal quality. Flimsy snaps will fail after six months of opening and closing. Test sample lids at the store if possible. Silicone gaskets (the rubber rings inside lids) stay flexible longer than hard plastic seals. For the freezer, confirm containers are rated for freezing, some plastics become brittle at low temperatures and crack when you pop the lid off.
If you’re environmentally conscious, top reusable storage options can reduce packaging waste. Look for durable containers you’ll keep for years, not disposable solutions you’ll pitch in 18 months. Brands offering lifetime warranties or replacement programs often indicate better construction.
Budget matters too. You don’t need premium containers for every pantry item. Reserve glass or stainless steel for frequently handled items: use affordable plastic for back-of-pantry staples.
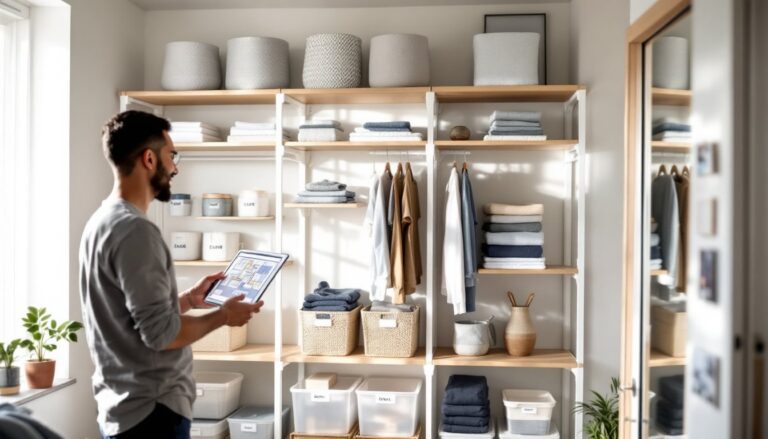
Organizing Your Kitchen With Storage Containers
Before buying containers, empty your cabinets and consolidate. Throw away expired items, transfer half-full boxes into one container, and group similar items, all flours together, all baking supplies in one zone, all snacks in another. This step shows you exactly what you need to store and in what quantities.
Label everything, even if containers are transparent. A white label maker or painter’s tape and a Sharpie works fine. Include the item name and the date you transferred it, this catches old goods before they spoil. Labeling takes five minutes but saves you from wondering “Is this from 2024 or 2025?”
Use vertical space. Stack containers, but keep frequently used items at eye level. Store occasional-use items (specialty flours, dietary-specific ingredients) on higher shelves. This principle applies whether you’re organizing open shelving, a deep pantry closet, or corner cabinet storage solutions.
Group containers by type and frequency of use. Daily-use items like sugar and coffee go in the most accessible spot. Baking ingredients used monthly go on a secondary shelf. Items you use a few times a year go higher up or toward the back. This reduces reaching and searching, making the kitchen feel more organized.
Consider drawer dividers in deep cabinets. Containers can tip over or slide around, especially on deeper shelves. A simple cardboard divider or a wooden shelf riser keeps stacks stable and prevents the avalanche when you grab one item. Plastic shelf risers are cheap and work well.
Maintenance and Care Tips for Long-Lasting Containers
Wash containers and lids in hot, soapy water before first use to remove manufacturing residues and dust. Dry completely before adding food, moisture invites mold and reduces shelf life.
When cleaning, pay attention to seals. Silicone gaskets trap food particles, especially starchy residue from flour and sugar. A quick rinse isn’t enough: use a soft brush or your fingernail to clean the seal’s grooves monthly. Dishwashers work for most plastic and glass, but hand-washing gaskets extends their life. Never force dried food into the groove, this can tear the seal.
Store lids separately if you notice them warping. Plastic lids can warp in the dishwasher’s heat, especially in the top rack. Hand-washing or bottom-rack placement prevents this. Once a lid warps, it won’t seal properly, and the container’s value drops.
For glass containers, avoid thermal shock (moving from freezer to hot soapy water instantly). Let them warm to room temperature first. Extreme temperature swings can cause stress fractures that spread over time. This sounds like overkill, but one cracked container mid-sandwich-prep teaches the lesson quickly.
Replace containers if you notice: discoloration you can’t scrub off, cloudy plastic, a seal that won’t click, or odor that lingers after washing. These signs indicate the container is aging and won’t protect food reliably anymore. A $5-10 replacement beats discovering stale or contaminated food.
For meal prep and rotating stock, use a simple FIFO rule: First In, First Out. Place newly purchased items behind older ones, so you use up older stock first. This works with containers too, place new containers at the back of the shelf, older ones toward the front.
Conclusion
Kitchen storage containers with lids transform a chaotic pantry into an organized, functional space. The right containers preserve freshness, reduce waste, and make cooking easier by showing you exactly what you have on hand. Start with an honest assessment of what you store, measure your shelf space, and invest in quality containers with reliable seals. Mix container types based on use, plastic for pantry staples, glass for the fridge, and specialized options for specific needs. Label, organize by frequency of use, and maintain seals and gaskets so containers last years, not months. A well-organized kitchen isn’t about Instagram aesthetics: it’s about efficiency, saving money, and actually enjoying the process of cooking at home.