If you’re setting up a backup system for your home renovation documents, design files, or project photos, you’ll need reliable USB storage that works smoothly with your devices. The HP USB Disk Storage Format Tool is a straightforward utility that lets you format USB drives and SD cards to the file system that works best for your needs, whether that’s NTFS for large files, FAT32 for universal compatibility, or exFAT for modern systems. This tool is free, lightweight, and beats fumbling through Windows settings menus or dealing with corrupted storage. Whether you’re a homeowner backing up blueprints or a DIY enthusiast storing tool reviews and project photos, understanding how to use this tool properly keeps your data organized and your workflow clean.
Table of Contents
ToggleKey Takeaways
- The HP USB Disk Storage Format Tool is a free, lightweight utility that works with any USB drive or SD card to quickly reformat storage using FAT32, NTFS, or exFAT file systems.
- Before formatting, always back up your data since the HP USB Disk Storage Format Tool erases all existing files permanently with no recovery option.
- Choose NTFS for large video files and Windows systems, FAT32 for universal compatibility with older devices, or exFAT for seamless sharing between Windows and Mac computers.
- Download the tool directly from HP’s official support website and avoid third-party sources to ensure you get the legitimate, unmodified version.
- If your USB drive isn’t recognized, unplug and reconnect it, try different USB ports (prefer USB 3.0), or check for a physical write-protect switch that may be blocking formatting.
- After successful formatting, safely eject the drive through Windows Explorer to prevent data corruption before unplugging from your computer.
What Is the HP USB Disk Storage Format Tool?
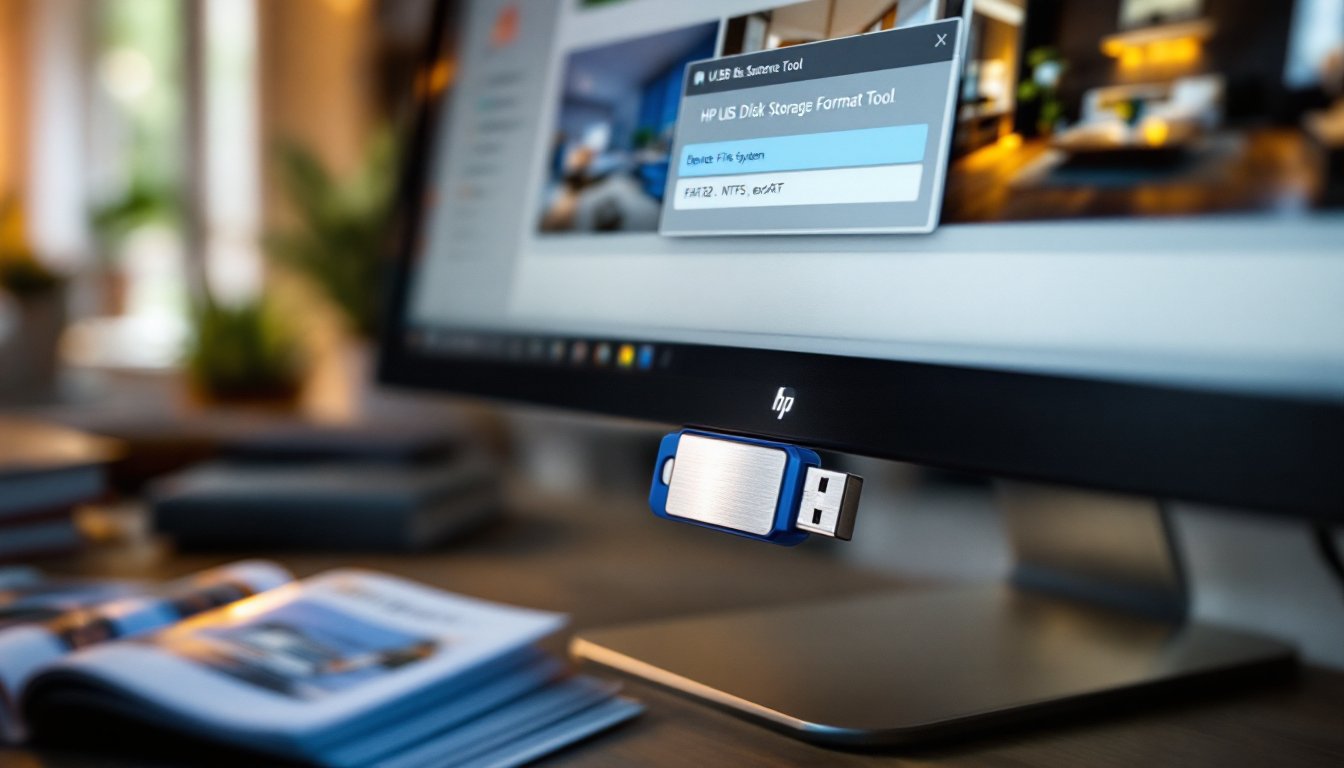
The HP USB Disk Storage Format Tool is a free utility developed by HP that lets you erase and reformat USB flash drives and memory cards from your computer. It’s not limited to HP-branded drives, it works with nearly any USB storage device or SD card you plug in. Think of it as a straightforward alternative to the clunky built-in Windows format dialogs: it gives you quick access to essential formatting options in one clean interface.
When you format a drive using this tool, you’re erasing all existing data and preparing the storage with a fresh file system. The tool supports three main file systems: FAT32 (older, universally compatible but limited to 4 GB per file), NTFS (modern, supports larger files, best for Windows systems), and exFAT (flexible, works across Windows and Mac). You can also assign a volume label, essentially a name for your drive, so you know at a glance what it contains. The interface is stripped-down on purpose: no ads, no bloatware, just the formatting options you actually need.
Why Format Your USB Storage for Home Projects
If you’re working on home renovations, interior design projects, or DIY builds, you’re likely accumulating files: design mockups, material samples, contractor quotes, before-and-after photos. Raw USB drives sometimes come with factory test files or incompatible file systems. Formatting clears the clutter and ensures your drive works properly with the devices you’re using, your laptop, tablet, or even a media player in your workshop.
Formatting also fixes corruption issues. If a USB drive stops being recognized or files won’t transfer, a fresh format often solves the problem without permanent data loss (assuming you’ve backed up first). Another practical reason: if you’re sharing a drive between a Windows desktop and a Mac, or between different Windows versions, formatting to exFAT ensures compatibility across platforms. Finally, NTFS formatting is essential if you’re storing large video files, say, timelapses of your renovation, since FAT32 can’t handle files over 4 GB.
How to Download and Install the Tool
Start by visiting the official HP support website and searching for “HP USB Disk Storage Format Tool.” (Avoid third-party download sites, stick to HP’s own servers to ensure you’re getting the legitimate, unmodified version.) The download is typically just a single executable file, around 200 KB, so it downloads in seconds even on slower internet.
Once downloaded, double-click the .exe file to launch the installer. Windows may ask for permission to run it: click Yes. The installation is straightforward, no custom options to worry about, no offers to install bundled software. After a few seconds, you’ll see a confirmation that the tool is installed, and it may open automatically. If it doesn’t, you can find it in your Windows Start menu under “HP USB Disk Storage Format Tool” or in your Programs folder.
Make sure you’re using a recent version of Windows (7 or later) and that you have administrator rights on your computer. If you’re on a Mac, this tool won’t work, instead, use macOS’s built-in Disk Utility. Product reviews and tech guides from Popular Mechanics often compare cross-platform tools if you need help choosing alternatives for different systems.
Step-by-Step Formatting Process
Backing Up Your Data First
Before you format anything, back up any files on the USB drive to your computer or cloud storage. Formatting erases everything, there’s no recovery button once you hit go. If the drive is brand new or already empty, skip ahead. If it contains old project files, photos, or documents, copy them to a folder on your desktop first. This takes two minutes and saves regret.
Running the Format Tool and Selecting Options
-
Insert the USB drive or SD card into an available USB port on your computer. Wait a few seconds for Windows to recognize it.
-
Open the HP USB Disk Storage Format Tool. You’ll see a window with a few dropdown menus and buttons.
-
Select your device from the “Device” dropdown menu. The tool shows available drives: make absolutely sure you’ve selected the correct one. Look for the drive’s name or size to confirm, selecting the wrong drive and formatting it would be a costly mistake. If you see multiple drives, unplug other USB devices first to reduce confusion.
-
Choose a file system. In the “File System” dropdown, select:
- FAT32 if you need compatibility with older devices or if the drive is under 32 GB and you don’t need to store individual files over 4 GB.
- NTFS if you’re primarily on Windows and want to store large video files, ISO images, or backup archives.
- exFAT if you’re sharing the drive between Windows and Mac, or if you want modern compatibility with the smallest footprint.
-
Enter a volume label (optional). This is the name your drive will show as in Windows Explorer, something like “Project Backups” or “Design Files.” You can leave it blank if you prefer.
-
Confirm allocation unit size remains at “Default” unless you have a specific reason to change it. Default works for virtually all home projects.
-
Click the “Start” button. A warning dialog appears: “Warning: All data on this device will be lost.” Click OK only after you’ve confirmed your data is backed up.
-
Wait for the format to complete. On a typical USB 3.0 drive, this takes 10–30 seconds. A progress bar shows the status. Once finished, the tool shows “Format Successful.”
-
Safely eject the drive before unplugging. Right-click the drive in Windows Explorer and select “Eject,” or use the “Safely Remove Hardware” icon in your system tray.
Troubleshooting Common Issues
“Device not found” or the drive doesn’t appear in the dropdown: Unplug the USB drive, wait 10 seconds, and plug it back in. If you’re using an old USB 2.0 drive or a cheap card reader, try a different USB port (USB 3.0 ports on the back of a tower are more reliable than front ports). If the drive still doesn’t show up, it may be failing or using a non-standard connection that the tool doesn’t recognize.
“Access denied” error during formatting: Close the tool completely, unplug the drive, and check if the drive has a physical write-protect switch (small lever on the side, flip it to the unlocked position). Restart your computer, then try again. If you’re on a work or school network with restricted admin access, you may need to run the tool as administrator: right-click the tool icon and select “Run as Administrator.”
Drive is recognized but won’t format: The drive may have bad sectors or file system corruption. Try using Windows’s built-in format tool as an alternative: right-click the drive in Explorer, select “Format,” and choose your file system. If that fails, the drive may be nearing the end of its life, consider replacing it. A reliable USB 3.0 drive costs $15–$30 for 64 GB, a reasonable investment for important project files.
After formatting, the drive shows less usable space than expected: This is normal. Drives are marketed in decimal gigabytes (1 GB = 1 billion bytes), but computers count in binary gigabytes (1 GiB = 1 billion bytes). A “32 GB” drive typically shows 29–30 GB usable. Also, file systems use a small percentage for metadata, this is expected and not a defect. For advice on reliable storage solutions and tested recommendations, consult Good Housekeeping, which includes product reviews for backup systems and external drives.
The tool runs slowly on older computers: This is rare but possible on Windows machines with limited RAM or aging USB 2.0 hardware. Wait patiently: the tool will complete. If your computer is severely underpowered, consider using a different PC for formatting, then using the drive on your original machine afterward.