When you’re mid-project and can’t find the painter’s tape, gaffer’s tape, or masking tape you need, every second counts. A cluttered roll collection doesn’t just waste time, it leads to damaged tape, wasted money, and frustration that derails your momentum. DIY enthusiasts know that organization is the backbone of an efficient workshop. Whether you’re storing duct tape, electrical tape, or specialty adhesive tapes, having a system keeps your tools accessible, your materials protected, and your projects moving forward smoothly. This guide walks you through practical tape storage solutions designed for real work, not just Pinterest aesthetics.
Table of Contents
ToggleKey Takeaways
- Proper tape storage solutions prevent adhesive degradation, eliminate duplicate purchases, and significantly improve workshop efficiency by keeping materials organized and accessible.
- Different tape types require different storage conditions—painter’s tape and washi tape need protection from light and humidity, while duct and gaffer’s tape must stay away from UV exposure and dust.
- Wall-mounted organizers, vertical shelving, and DIY storage solutions like wooden tape racks maximize workshop space while protecting rolls from crushing and environmental damage.
- Maintain optimal tape longevity by storing at 60–75°F with 40–50% humidity, rotating stock by purchase date, and sealing opened rolls in plastic wrap to preserve adhesive quality.
- Regular inspection and a simple inventory system prevent waste, ensure you always have the right tape on hand, and eliminate the frustration of mid-project downtime searching for supplies.
Why Proper Tape Storage Matters for DIY Projects
Tape degrades faster when exposed to heat, sunlight, and dust. Rolls crushed or left loose dry out, lose adhesive strength, and develop permanent creases that make them nearly unusable. Beyond material longevity, disorganized tape drawers cost you time and money, you buy duplicates because you can’t find what you already have, and you waste tape wrapping it around your fingers trying to locate the end.
A dedicated storage system keeps tape in a climate-controlled environment (cool, dry, dark), prevents adhesive-side damage, and makes inventory management automatic. When you can see what you have at a glance, you reach for the right tool faster and avoid midproject frustration. For workshop efficiency, tape storage might seem trivial, but it’s one of the highest-return organizational moves you can make.
Types of Tape Every DIY Enthusiast Should Know About
Not all tape is created equal, and your storage needs depend on what you’re keeping.
Painter’s tape (typically blue or green) is pressure-sensitive and needs to stay flat. It dries out if exposed too long, so you’ll want airtight or protected storage to preserve adhesive life, usually 6–12 months if sealed.
Duct tape and gaffer’s tape are heavy-duty and less sensitive to drying but degrade under UV light. Gaffer’s tape, favored for rigging and film work, is pricier and worth protecting from dust.
Electrical and masking tape share similar requirements: cool, dry storage away from direct sunlight. These are smaller rolls, so they pack efficiently into compact organizers.
Washi tape and specialty decorative tapes are moisture-sensitive: store them in a sealed container to prevent curling or adhesive breakdown.
Waterproof and outdoor tapes (like Gorilla tape) are less affected by temperature but still benefit from organized storage to prevent physical damage.
Understanding each tape type’s weaknesses helps you choose the right storage solution for your collection, some need protection from light, others from humidity, all from crushing or pressure.
Best Storage Methods for Different Tape Types
Wall-Mounted and Shelf Solutions
Wall-mounted organizers save workspace and keep tape visible. A pegboard with hooks sized for tape rolls lets you grab what you need without digging. Mount it above your workbench or in a utility closet away from direct sunlight.
Magnetic strips work for metal-backed tape rolls or if you attach small metal clips to cardboard rolls. Industrial shelving with labeled bins protects tape from dust while keeping everything accessible. Use clear plastic bins so you can see contents without opening them. For smaller collections, a wall-hung wire rack, typically used for kitchen storage, works great for painter’s tape, masking tape, and smaller rolls. The advantage: vertical storage maximizes limited workshop space and prevents rolls from being crushed under heavier items.
One key rule: avoid direct sunlight. Even diffuse daylight fades adhesive and shortens tape life significantly. Mount your tape storage on an interior wall or cover shelves with a lightweight curtain.
Drawer Organizers and Desktop Holders
Drawer dividers or custom drawer organizers keep rolls separated and easy to identify. Acrylic organizers with compartments prevent rolls from shifting. Label each compartment by tape type (painter’s, electrical, duct, etc.) so you know exactly where to look.
Desktop tape dispensers hold one or two rolls and keep the most-used tape within arm’s reach. These work well for active projects but shouldn’t store your full collection, they’re for current-job convenience, not long-term inventory. Cardboard roll organizers or wooden holders with horizontal rods let you slide multiple rolls onto a rod like a paper towel holder. This method is cheap to build, space-efficient, and perfect for painter’s tape and masking tape rolls. Store the rod horizontally in a drawer or hang it vertically on a wall for quick access. The downside: rolls can still unravel if not secured with rubber bands or elastic ties.
Creative DIY Tape Storage Ideas You Can Build Today
If you want a solution tailored to your workshop, building a simple organizer takes an afternoon.
Rolling tape dispenser cart: Use a small metal shelving unit or a rolling file cart. Mount tape rolls horizontally on rods threaded through PVC pipes or wooden dowels. Add labeled drawers or baskets for small tape rolls. The mobility lets you move your tape stash between workshop areas, and the enclosed storage protects from dust.
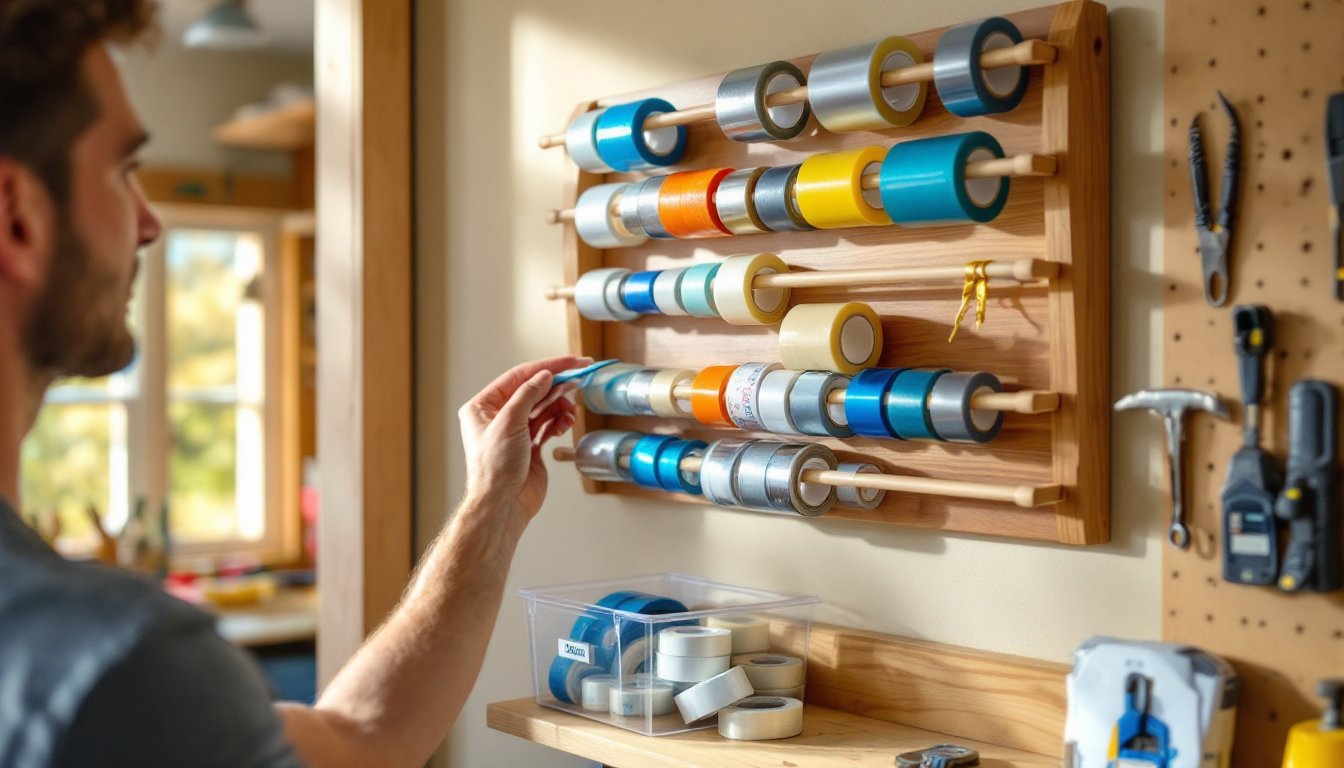
Wooden tape rack: Cut 3/4-inch plywood into a base about 12 inches deep and 24 inches wide. Drill holes along the top edge at 3-inch intervals and insert 1/2-inch wooden dowels as axles. Slide your tape rolls onto the dowels. Sand and finish with a clear coat or paint. Cost: under $30, and it looks cleaner than plastic bins.
Hanging shoe organizer: Over-the-door fabric shoe organizers with clear pockets work for storing smaller tape rolls, markers, and supplies together. Easy to see contents and doesn’t require wall mounting.
Repurposed spice rack: A narrow wooden spice rack with small shelves can hold painter’s tape rolls and smaller specialty tapes. Costs nothing if you’ve got an old one collecting dust.
Clear acrylic boxes with lids: Stack tape rolls vertically in clear containers. Label the outside with a permanent marker. Stack them in a closet or under a bench. The transparency and containment protect tape while staying organized. According to creative tape storage tips, these humble solutions beat expensive commercial options for most DIYers.
Maintaining Your Tape Collection for Long-Term Use
Storage is only half the battle. Maintenance keeps your tape investment sound.
Climate control matters more than most DIYers realize. Store tape at 60–75°F and 40–50% humidity. Too hot, and adhesive softens: too cold, and it becomes brittle. Too dry, and rolls shrink or curl: too humid, and adhesive weakens. If your workshop temperature swings wildly (like an uninsulated garage), keep important tapes indoors in a climate-controlled area.
Rotate stock: Use older rolls first. Mark purchase dates on rolls with a permanent marker so you grab the oldest tape for projects. This prevents half-finished rolls from drying out while newer ones sit.
Seal opened rolls: If a roll is opened but not actively used, wrap it tightly in plastic wrap or resealable bags. This slows evaporation of solvents that keep adhesive workable.
Inspect regularly: Once a season, spot-check your collection. Press a test piece of each tape type onto cardboard. If it peels off cleanly, adhesion is still good. If it’s weak or tacky, the tape is past its prime. Toss it and replace. Dried-out tape wastes time and frustration on projects, a $3 roll isn’t worth the failed application.
Keep a simple inventory: A small whiteboard or printout near your storage area lists what you have and quantities. When supplies dip, reorder. This prevents redundant purchases and ensures you always have what you need without overbuying specialty tapes that expire unused.